 Download related material
When it comes to application development, localization is perhaps the few things we do every day without even thinking. Most products / projects will have their own well defined way to localize information. I'll recap the basic localization support DotNet offers via a simple console application.
Localization is provided by bundling all language specific information into a single assembly known as a sattelite assembly. A sattelite assembly is build for each language we want to support. Visual Studio has very good support for building localized content and generating the sattelite assemblies by itself.
In this post, we'll look at two samples; one where we use Visual Studio to do everything and second where we will use AssemblyLinker (al.exe) to generate the satellite assemblies by hand. In both samples, we'll support three languages: neutral, en-IN and en-GB. The neutral language resources will be used whenever the application is run on a system whose language does not match any of the two languages (en-IN and en-GB).
Sample 1 - Using Visual Studio for everything
Step 1
Create a new command line application project named 'localized' using Visual Studio
Step 2
Create a folder called Resources at the root of the project, this for helping us keep resource files together and avoid clutter.
Step 3
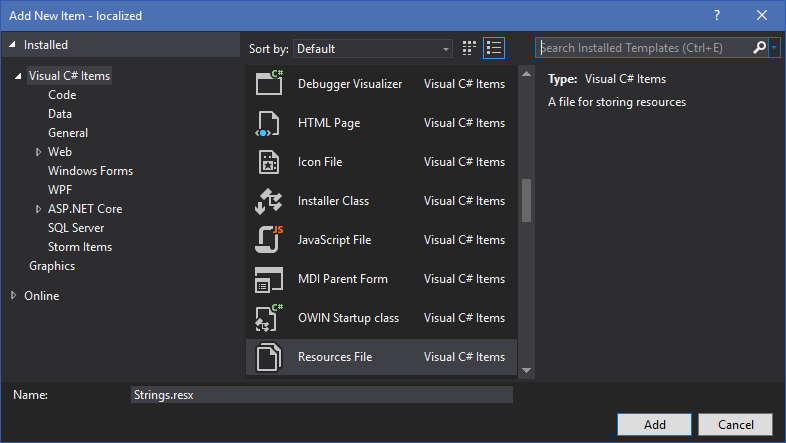
In Visual Studio, right click on the Resources folder and select Add -> New Item and select Resources file. Name the file Strings.resx - this is going to be the default resource file.

Similary add another one named 'Strings.en-in-resx' and another one named 'Strings.en-gb-resx'.
Double-click the String.resx file and enter a string named 'Greeting' with value 'How are ya?'. Similarly, open the Strings.en-in.resx file and enter a string with the same name 'Greeting' and value 'Namaste!'. Do the same for Strings.en-gb.resx and use the value 'How are you?'.
Ensure the build action for all the resx files is set to 'Embedded Resource'; this can be see in the properties window.
Step 4
Build the project once to see everything builds OK. Open the Program.cs file and edit the code to match:
using localized.Resources;
using System;
using System.Globalization;
using System.Threading;

namespace localized
{
	class Program
	{
		static void Main(string[] args)
		{
			Print();

			// Lets switch our language
			Thread.CurrentThread.CurrentUICulture = new CultureInfo("en-in");
			Print();

			// Lets switch our language again
			Thread.CurrentThread.CurrentUICulture = new CultureInfo("en-gb");
			Print();
		}

		static void Print()
		{
			Console.WriteLine("You say '{0}' in {1}", Strings.Greeting, Thread.CurrentThread.CurrentUICulture);
		}
	}
}
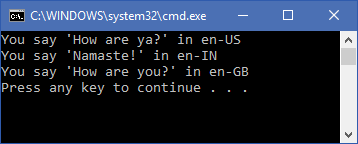
Run the application to view the output.

As you can see, a different greeting is printed for each language.
If you inspect the bin\debug folder, you'll see the exe as well as a folders named en-IN & en-GB. These folders contain the resource dll for the respective language. In the next example, we'll build the resource dlls ourself. The whole languages support works on the basis of placing the resource dlls in the correct language folders.
Sample 2 - Building the resource dlls ourself
Step 1
Copy the entire project folder of sample 1. After copying, rename the project file in the new copy to localized2.csproj and add it to the solution. This is just so that we don't need to retype all the strings we defined in the last project. Since we don't want Visual Studio's help to build the resource dlls, select the Strings.en-gb.resx and Strings.en-in.resx and set the 'Build Action' in the properties windows to 'None'. Rebuild the project and run it, you should see only the default language greeting string for all the languages. Note, we are string building the Strings.resx as an embedded resource so that it will be available within the exe; this is a good practice to have the neutral culture resource in the main assembly.
Step 2
Start the Developer Command Prompt for Visual Studio and navigate to the project folder. In the command prompt type in 'notepad build-resources.bat' & enter the following content and save the file.
resgen Resources\Strings.en-in.resx Resources/localized.Resources.Strings.en-in.resources
md bin\debug\en-in
al /t:lib /culture:en-in /embed:Resources/localized.Resources.Strings.en-in.resources /out:bin\debug\en-in\localized.resources.dll

resgen Resources\Strings.en-gb.resx Resources/localized.Resources.Strings.en-gb.resources
md bin\debug\en-gb
al /t:lib /culture:en-gb /embed:Resources/localized.Resources.Strings.en-gb.resources /out:bin\debug\en-gb\localized.resources.dll
What we have here are the commands to compile the resources in the resx to a resource file using the resgen utility. The next utlity al (assembly linker) is used to build an assembly out of the binary resource file and while doing so also mark the culture-information against the assembly.
Run this batch file from the project folder where you have the localized2.csproj file. The output should look something like this:

Build the actual project. Running the application should give you the same output as the first.
So there you have it - building plain vanilla resource dlls using Visual Studio and using DotNet's SDK tools.
 Download related material
