Overview
Protecting your services using some sort of authentication and/or authorization is now an old concept. This post discusses on how we can use KeyCloak to act as an identity provider (IDP) and how services can work with KeyCloak to ensure only authorized users are able to access their APIs. The post uses Python Flask APIs and runs Keycloak and the service on Windows.
The scenario
Let's say we have a main web application which provides certain capabilities to users. If you are doing
micro-services, you'll have related capabilities spearated as separate services and running independently
and hopefully stateless. This post uses the example of a 'Jobs' service that enables users to submit jobs
and retrieve the status of a submitted job. There is no 'main web application', this will be simulated
using curl commands. Here is a diagram showing the main flow:

Setting up KeyCloak
KeyCloak is a software that can act as an Identity Provider and it supports a number of protocols one of them being OIDC. KeyCloak has a bunch of concepts that fit neatly into what we are trying to achive in this post.
Realm
Realm is a container object in KeyCloak, within this boundary we can create users, groups, roles, client and other objects. We will use only clients, users and roles in this blog post. Any of these objects belong to a single realm. I'd say realm is analogous to a domain. We will use a realm named 'demo' in this post.
Client
Client defines a service providers (your micro-service). A client will have its own secret key along and it will define permissions that a user pay possess w.r.t. to the service. We define two permissions 'CreateJob' and 'ViewJob' each of which is checked in the Flask APIs.
Roles
Roles are analogous to permissions, roles can be defined at the level of the realm or a client. We will define roles at the level of the client.
User
Represents the user account that accesses the system. A user can belong to a group and is assigned permissions using roles directly or via groups.
First get Java 11
Before KeyCloak can run, we need to have Java installed on our system. Download you favorite distribution or JDK 11 or higher; my personal preference is OpenJDK created by AZUL which can be downloaded from azul.com. Ensure JAVA_HOME environment variable is set to the JDK install directory and the bin folder is added to the PATH variable.
Start KeyCloak
Before anything else, we need to download KeyCloak. You can download the latest version of KeyCloak from keycloak.org. KeyCloak can run in either production or development mode. Production mode requires setting a number of infrastructure like certificates and others. Running it in deveopment mode is a lot easier which is what we will do. Use the following command to run KeyCloak:
    ```
    > kc.bat start-dev
    ```
Create a new realm
Click the realms dropdown from the left pane and create the a new realm ('demo' is the name used in this post).

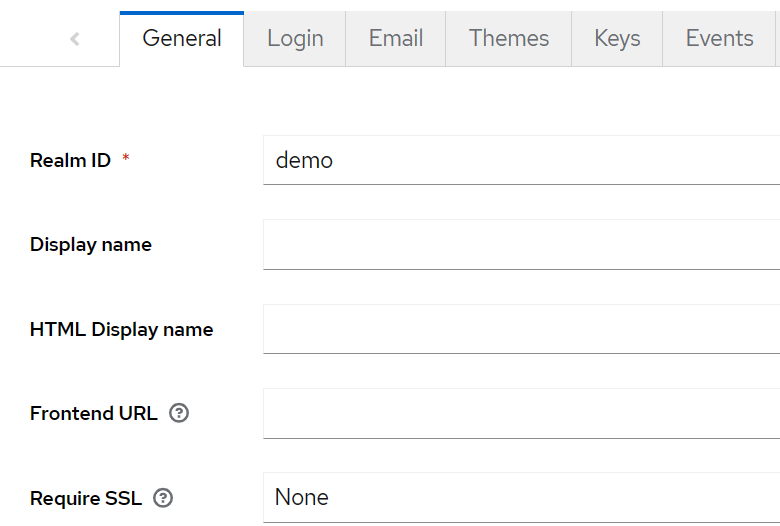
Select the newly created realm and click the 'Realm settings' item from the left pane. Ensure 'Require SSL' is set to None.
Next, click the 'Tokens' tab and select HS256 as the default signature algorithm.
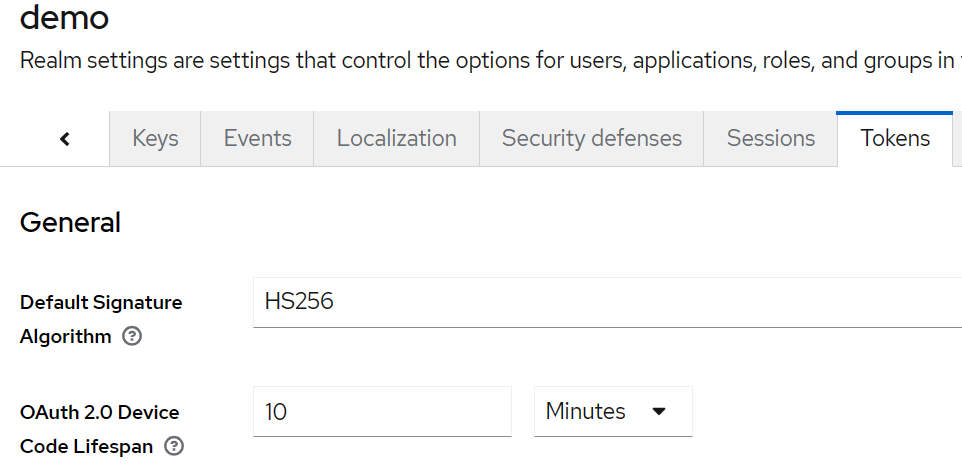
Scroll all the way down and click the 'Save' button.
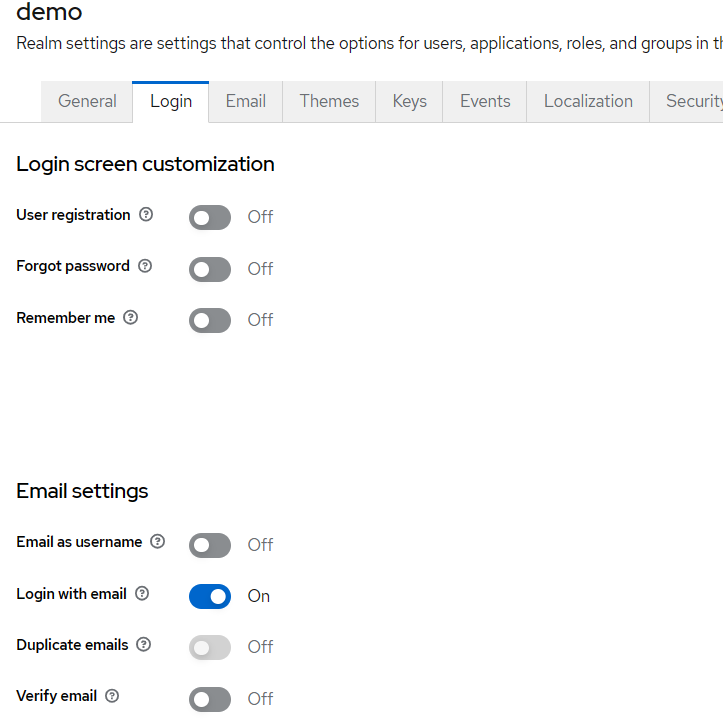
Ensure 'Email as username' is enabled in the Login tab.
Create a new client
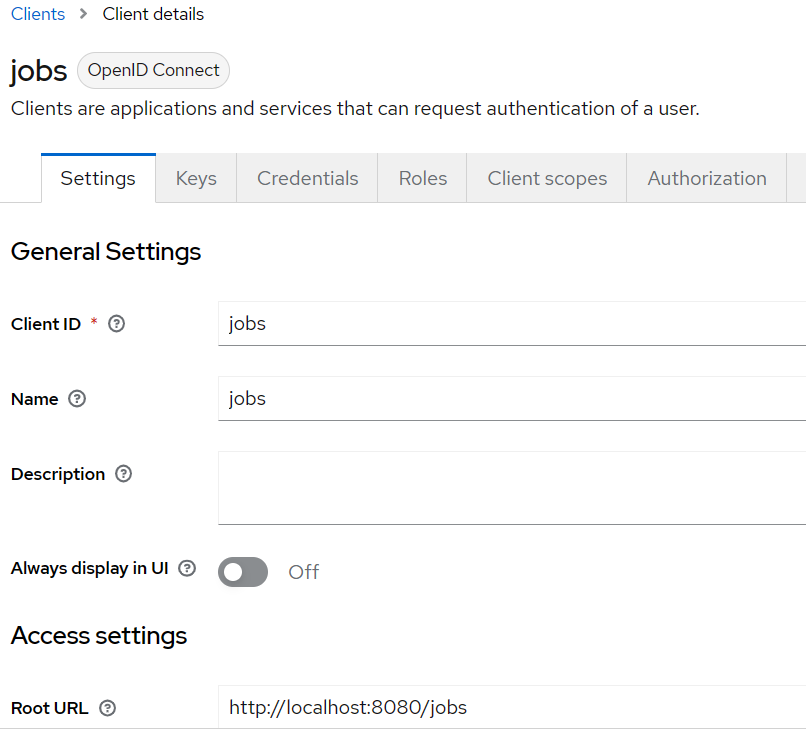
Click the 'Clients' item from the left pane and then click the 'Create client' button to create a new client. The new client is named 'jobs' in this exmaple. The client represents the jobs-service which will depend on JWTs issued by KeyCloak to check if a user has the correct authorization to invoke a particular API.
Ensure the details are correctly in the 'Settings' tab:
- Root URL should be set to http://localhost:8080/jobs
- Valid redirect URL should be set to http://localhost:5000/jobs
- Web origins should be set to http://localhost:5000 which is the Flask service running on port 5000
- Ensure Client authentication is enabled
- Ensure Authorization is enabled
- Ensure Standard flow and Direct access grants are enabled
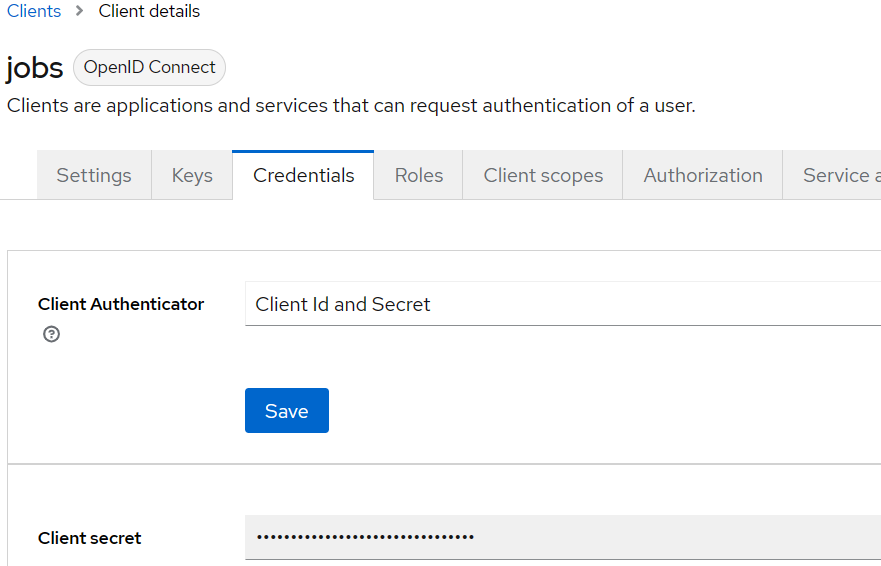
Click the 'Credentials' tab and select 'Client id and secret' for 'Client authenticator'.
Create two roles
Click the 'Roles' tab of the 'jobs' client and create two roles:
- CreateJob
- ViewJob
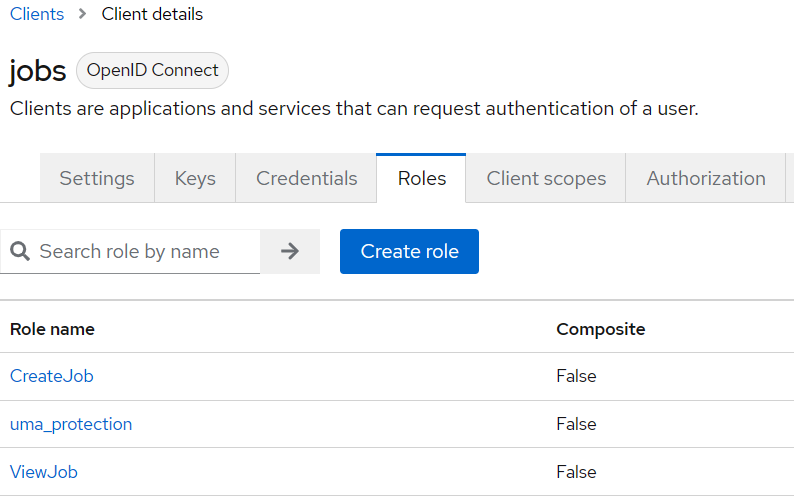
We will be checking for the existence of these roles to decide if a user is authorized to call a particular API.
Create two users
While still in the 'demo' realm, click the 'Users' item from the left pane and create a new user by clicking the 'Add user' button.
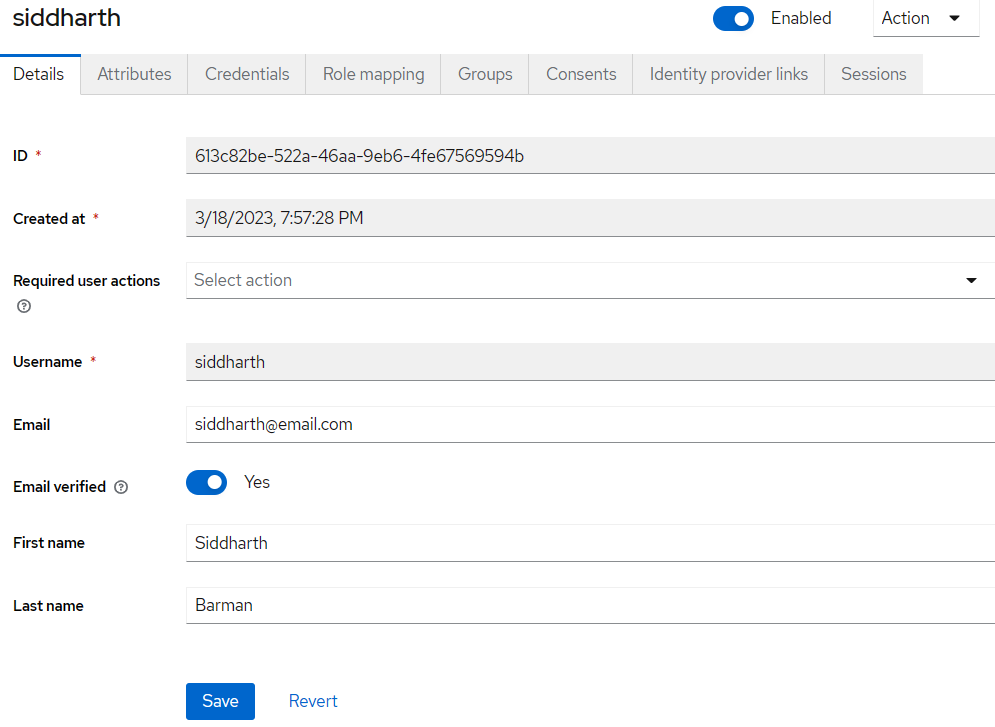
Click the 'Credentials' tab and set a password for the user. Ensure the 'Temporary' checkbox is disabled.
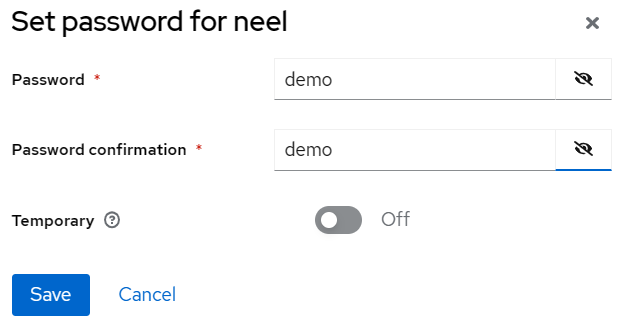
Ensure the 'Email verified' checkbox is checked. Click 'Save'.
Click the 'Role mapping'. Click the 'Assign role' button and select the 'CreateJob' and 'ViewJob'
roles and click the 'Assign' button.

Perform the same steps for another user 'Neel' but assign him only the 'ViewJob' role.
Requesting a token
Suppose it is Siddharth who is accessing the system, a token can be requested for Siddharth using the following API call to KeyCloak:
curl -L -X POST http://localhost:8080/realms/demo/protocol/openid-connect/token -H "Content-Type: application/x-www-form-urlencoded" --data-urlencode "client_id=jobs" --data-urlencode "grant_type=password" --data-urlencode "client_secret=YneoUkwzCDylmForeRSBDIUpYfgMmxPR" --data-urlencode "scope=openid" --data-urlencode "username=siddharth" --data-urlencode "password=demo"
Retrieving KeyCloak's signing key used for HMAC
KeyCloak generates a signing key which is used to generate the verification signature of JWTs. This key can be retrieved using the following steps:
Connect to the default KeyCloak's H2 database by opening a command-prompt and navigating to the <KeyCloak-Install-Folder>/lib/lib e.g.
cd D:\Servers\KeyCloak\lib\lib
java -jar com.h2database.h2-2.1.214.jar
Navigate to H2 DB's web UI: http://localhost:8082/
Specify the JDBC url: jdbc:h2:file:<KeyCloak-Install-Folder>/data/h2/keycloakdb;AUTO_SERVER=TRUE .e.g. jdbc:h2:file:d:/Servers/keycloak/data/h2/keycloakdb;AUTO_SERVER=TRUE
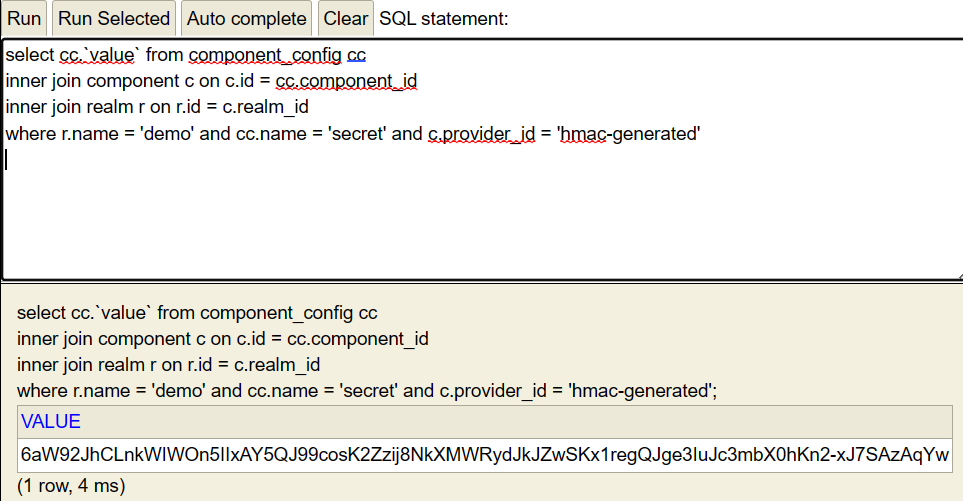
Use the default credentials sa, password & execute the following query:
select cc.`value` from component_config cc
inner join component c on c.id = cc.component_id
inner join realm r on r.id = c.realm_id
where r.name = 'demo' and cc.name = 'secret' and c.provider_id = 'hmac-generated'
Copy the value. Here is a screenshot:
Keep this key handy, we will need it later.
The Python Flask REST service
This service allows creating and retrieving a resource called 'Job'. The first version of the service will not be secured i.e. no checking of authorization. Below are the steps to get it running.
Create a Python virtual environment
We'll now create a simple REST API using the Flask Python library. You should have Python 3.X installed on your machine already. First let's create a virtual environment containing Flask:
pip install virtualenv
virtualenv flaskenv
We can now activate the virtual environment and install the Flask library.
flaskenv\Scripts\activate.bat
Next we'll install the dependencied needed by the Python API project. The requirements.txt file is present in the 'python-client' folder.
pip install -r requirements.txt
The Flask REST API code is very simple:
    from flask import Flask, request
    from flask_restful import Resource, Api
    import json

    app = Flask(__name__)
    api = Api(app)

    class Jobs(Resource):
        _jobs = []
        _last_job_id = 0

        def get(self, id):
            result = None
            for job in Jobs._jobs:
                if job["id"] == id:
                    result = job
                    break
            if (result == None):
                return "Not found", 404
            else:
                return json.dumps(self._jobs), 200

        def post(self):
            job = request.get_json()
            Jobs._last_job_id = Jobs._last_job_id + 1
            job["id"] = Jobs._last_job_id
            Jobs._jobs.append(job)
            return json.dumps(job), 201

        def delete(self, id):
            result = None
            for job in Jobs._jobs:
                if job["id"] == id:
                    result = job
                    Jobs._jobs.remove(job)
                    break
            if result == None:
                return "Not found", 404
            else:
                return json.dumps(result), 200

    api.add_resource(Jobs, "/jobs/<int:id>", "/jobs")

    # driver function
    if __name__ == '__main__':
        app.run('0.0.0.0', debug = True, port=5000)
We will be using the following endpoints of the Flask application:
- POST verb at /jobs to allow creating a new job
- GET verb at /jobs to retrieve all jobs created so far
curl --header "Content-Type: application/json" --request POST --data "{""name"": ""purge job""}" http://127.0.0.1:5000/jobs
Existing jobs can be retrieved using curl:
curl -i http://localhost:5000/jobs/1
These APIs are not yet secured in anyway. We secure these APIs using JWTs in the next step. We wil use PyJWT library for working with JSON web tokens.
pip install PyJWT
The earlier code has been modified to expect and inspect the JWT passed to it. Note we have stored the signing key retrieved from KeyCloak's database in 'app.config["SECRET_KEY"]'. The new version of the service is below:
    from flask import Flask, request
    from flask_restful import Resource, Api
    import json

    # JWT libs
    import jwt
    from datetime import datetime, timedelta
    import base64
    from functools import wraps

    def base64url_decode(input):
        if isinstance(input, str):
            input = input.encode("ascii")
        rem = len(input) % 4
        if rem > 0:
            input += b"=" * (4 - rem)
        return base64.urlsafe_b64decode(input)

    app = Flask(__name__)
    app.config["SECRET_KEY"] = base64url_decode("6aW92JhCLnkWIWOn5IIxAY5QJ99cosK2Zzij8NkXMWRydJkJZwSKx1regQJge3IuJc3mbX0hKn2-xJ7SAzAqYw")
    api = Api(app)

    class Jobs(Resource):
        _jobs = []
        _last_job_id = 0

        def __init__(self):
            self.client_name = "jobs"

        def get_auth_token(self, request):
            token = None
            if "Authorization" in request.headers:
                token = request.headers["Authorization"]
                token = token.replace("Bearer ", "")
            return token

        def is_role_present(self, decoded_jwt, required_role):
            if "resource_access" not in decoded_jwt.keys():
                return False

            if self.client_name not in decoded_jwt["resource_access"].keys():
                return False

            if "roles" not in decoded_jwt["resource_access"][self.client_name].keys():
                return False

            roles = decoded_jwt["resource_access"][self.client_name]["roles"]
            return required_role in roles

        def get(self, id):
            token = self.get_auth_token(request=request)
            if token == None:
                return "Unauthorized", 401

            jwt_options = { 'verify_signature': True, 'verify_exp': True, 'verify_nbf': False, 'verify_iat': False, 'verify_aud': False }
            data = jwt.decode(jwt=token, key=app.config["SECRET_KEY"], algorithms=["HS256"], audience="demo", options=jwt_options)

            if not self.is_role_present(data, "ViewJob"):
                return "Unauthorized", 401
            else:
                print("User has the ViewJob role")

            result = None
            for job in Jobs._jobs:
                if job["id"] == id:
                    result = job
                    break

            if (result == None):
                return "Not found", 404
            else:
                return json.dumps(result), 200

        def post(self):
            token = self.get_auth_token(request=request)
            if token == None:
                return "Unauthorized", 401

            jwt_options = { 'verify_signature': True, 'verify_exp': True, 'verify_nbf': False, 'verify_iat': False, 'verify_aud': False }
            data = jwt.decode(jwt=token, key=app.config["SECRET_KEY"], algorithms=["HS256"], audience="demo", options=jwt_options)

            if not self.is_role_present(data, "CreateJob"):
                return "Unauthorized", 401
            else:
                print("User has the CreateJob role")

            job = request.get_json()
            Jobs._last_job_id = Jobs._last_job_id + 1
            job["id"] = Jobs._last_job_id
            Jobs._jobs.append(job)
            return json.dumps(job), 201

        def delete(self, id):
            result = None
            for job in Jobs._jobs:
                if job["id"] == id:
                    result = job
                    Jobs._jobs.remove(job)
                    break
            if result == None:
                return "Not found", 404
            else:
                return json.dumps(result), 200

    api.add_resource(Jobs, "/jobs/<int:id>", "/jobs")

    # driver function
    if __name__ == '__main__':
        app.run('0.0.0.0', debug = True, port=5000)
If it's Siddharth that is accessing the API, we can first request a token for Siddharth using the following KeyCloak API:
curl -L -X POST http://localhost:8080/realms/demo/protocol/openid-connect/token -H "Content-Type: application/x-www-form-urlencoded" --data-urlencode "client_id=jobs" --data-urlencode "grant_type=password" --data-urlencode "client_secret=YneoUkwzCDylmForeRSBDIUpYfgMmxPR" --data-urlencode "scope=openid" --data-urlencode "username=siddharth" --data-urlencode "password=demo"
In order to create a new job, we now have to specify the JWT.
curl -H "Content-Type: application/json" -H "Authorization: Bearer eyJhbGciOiJIUzI1NiIsInR5cCIgOiAiSldUIiwia2lkIiA6ICI4YTBjMzdhNS1mZTc4LTQzZTQtOGYzMC1hZjc5NDg3MTk1YWEifQ.eyJleHAiOjE2NzkyNDgyNDIsImlhdCI6MTY3OTI0NzA0MiwianRpIjoiYzkxZDk3MTctYzY3Mi00YzI3LTg4ODgtN2Y2YzhlOTYzNTA5IiwiaXNzIjoiaHR0cDovL2xvY2FsaG9zdDo4MDgwL3JlYWxtcy9kZW1vIiwiYXVkIjoiYWNjb3VudCIsInN1YiI6IjYxM2M4MmJlLTUyMmEtNDZhYS05ZWI2LTRmZTY3NTY5NTk0YiIsInR5cCI6IkJlYXJlciIsImF6cCI6ImpvYnMiLCJzZXNzaW9uX3N0YXRlIjoiMzhhZTY4Y2MtYTA5Ny00Y2M5LWI5ZmYtNTU0MjI5MTg2ZjdkIiwiYWNyIjoiMSIsImFsbG93ZWQtb3JpZ2lucyI6WyJodHRwOi8vbG9jYWxob3N0OjUwMDAiXSwicmVhbG1fYWNjZXNzIjp7InJvbGVzIjpbIm9mZmxpbmVfYWNjZXNzIiwiZGVmYXVsdC1yb2xlcy1kZW1vIiwidW1hX2F1dGhvcml6YXRpb24iXX0sInJlc291cmNlX2FjY2VzcyI6eyJqb2JzIjp7InJvbGVzIjpbIlZpZXdKb2IiLCJDcmVhdGVKb2IiXX0sImFjY291bnQiOnsicm9sZXMiOlsibWFuYWdlLWFjY291bnQiLCJtYW5hZ2UtYWNjb3VudC1saW5rcyIsInZpZXctcHJvZmlsZSJdfX0sInNjb3BlIjoib3BlbmlkIHByb2ZpbGUgZW1haWwiLCJzaWQiOiIzOGFlNjhjYy1hMDk3LTRjYzktYjlmZi01NTQyMjkxODZmN2QiLCJlbWFpbF92ZXJpZmllZCI6dHJ1ZSwibmFtZSI6IlNpZGRoYXJ0aCBCYXJtYW4iLCJwcmVmZXJyZWRfdXNlcm5hbWUiOiJzaWRkaGFydGgiLCJnaXZlbl9uYW1lIjoiU2lkZGhhcnRoIiwiZmFtaWx5X25hbWUiOiJCYXJtYW4iLCJlbWFpbCI6InNpZGRoYXJ0aEBlbWFpbC5jb20ifQ.HUlIrJbVSNAfdX0TyxofxCmU-AbyYrOl00jdG5oHm4w" -i  --request POST --data "{""name"": ""purge job""}" http://127.0.0.1:5000/jobs
HTTP/1.1 201 CREATED
Server: Werkzeug/2.2.3 Python/3.11.2
Date: Sun, 19 Mar 2023 17:38:19 GMT
Content-Type: application/json
Content-Length: 39
Connection: close

"{\"name\": \"purge job\", \"id\": 2}"
We see that the API has succeeded and a new job has been created. We can now view the job using the GET API:
curl -i -H "Authorization: Bearer eyJhbGciOiJIUzI1NiIsInR5cCIgOiAiSldUIiwia2lkIiA6ICI4YTBjMzdhNS1mZTc4LTQzZTQtOGYzMC1hZjc5NDg3MTk1YWEifQ.eyJleHAiOjE2NzkyNDgyNDIsImlhdCI6MTY3OTI0NzA0MiwianRpIjoiYzkxZDk3MTctYzY3Mi00YzI3LTg4ODgtN2Y2YzhlOTYzNTA5IiwiaXNzIjoiaHR0cDovL2xvY2FsaG9zdDo4MDgwL3JlYWxtcy9kZW1vIiwiYXVkIjoiYWNjb3VudCIsInN1YiI6IjYxM2M4MmJlLTUyMmEtNDZhYS05ZWI2LTRmZTY3NTY5NTk0YiIsInR5cCI6IkJlYXJlciIsImF6cCI6ImpvYnMiLCJzZXNzaW9uX3N0YXRlIjoiMzhhZTY4Y2MtYTA5Ny00Y2M5LWI5ZmYtNTU0MjI5MTg2ZjdkIiwiYWNyIjoiMSIsImFsbG93ZWQtb3JpZ2lucyI6WyJodHRwOi8vbG9jYWxob3N0OjUwMDAiXSwicmVhbG1fYWNjZXNzIjp7InJvbGVzIjpbIm9mZmxpbmVfYWNjZXNzIiwiZGVmYXVsdC1yb2xlcy1kZW1vIiwidW1hX2F1dGhvcml6YXRpb24iXX0sInJlc291cmNlX2FjY2VzcyI6eyJqb2JzIjp7InJvbGVzIjpbIlZpZXdKb2IiLCJDcmVhdGVKb2IiXX0sImFjY291bnQiOnsicm9sZXMiOlsibWFuYWdlLWFjY291bnQiLCJtYW5hZ2UtYWNjb3VudC1saW5rcyIsInZpZXctcHJvZmlsZSJdfX0sInNjb3BlIjoib3BlbmlkIHByb2ZpbGUgZW1haWwiLCJzaWQiOiIzOGFlNjhjYy1hMDk3LTRjYzktYjlmZi01NTQyMjkxODZmN2QiLCJlbWFpbF92ZXJpZmllZCI6dHJ1ZSwibmFtZSI6IlNpZGRoYXJ0aCBCYXJtYW4iLCJwcmVmZXJyZWRfdXNlcm5hbWUiOiJzaWRkaGFydGgiLCJnaXZlbl9uYW1lIjoiU2lkZGhhcnRoIiwiZmFtaWx5X25hbWUiOiJCYXJtYW4iLCJlbWFpbCI6InNpZGRoYXJ0aEBlbWFpbC5jb20ifQ.HUlIrJbVSNAfdX0TyxofxCmU-AbyYrOl00jdG5oHm4w" http://localhost:5000/jobs/1
HTTP/1.1 200 OK
Server: Werkzeug/2.2.3 Python/3.11.2
Date: Sun, 19 Mar 2023 17:39:30 GMT
Content-Type: application/json
Content-Length: 79
Connection: close

"{\"name\": \"purge job\", \"id\": 1}"
If we switch to the user Neel and try to create a job:
curl -i -H "Content-Type: application/json" -H "Authorization: Bearer eyJhbGciOiJIUzI1NiIsInR5cCIgOiAiSldUIiwia2lkIiA6ICI4YTBjMzdhNS1mZTc4LTQzZTQtOGYzMC1hZjc5NDg3MTk1YWEifQ.eyJleHAiOjE2NzkyNDg5MzgsImlhdCI6MTY3OTI0NzczOCwianRpIjoiNGRhZTJlNDAtZjE4Yi00OTgxLWEzODctNTdmMGU5OTc2NWY5IiwiaXNzIjoiaHR0cDovL2xvY2FsaG9zdDo4MDgwL3JlYWxtcy9kZW1vIiwiYXVkIjoiYWNjb3VudCIsInN1YiI6ImI3NGQ2Mjg3LTUyNDQtNDU4MC1iYmRkLTg5ODMxMmE4NjJiZCIsInR5cCI6IkJlYXJlciIsImF6cCI6ImpvYnMiLCJzZXNzaW9uX3N0YXRlIjoiNGY1ZDUzYmYtY2IwYy00NzY5LWIyM2YtYzA4NTkxZDM0MmNmIiwiYWNyIjoiMSIsImFsbG93ZWQtb3JpZ2lucyI6WyJodHRwOi8vbG9jYWxob3N0OjUwMDAiXSwicmVhbG1fYWNjZXNzIjp7InJvbGVzIjpbIm9mZmxpbmVfYWNjZXNzIiwiZGVmYXVsdC1yb2xlcy1kZW1vIiwidW1hX2F1dGhvcml6YXRpb24iXX0sInJlc291cmNlX2FjY2VzcyI6eyJqb2JzIjp7InJvbGVzIjpbIlZpZXdKb2IiXX0sImFjY291bnQiOnsicm9sZXMiOlsibWFuYWdlLWFjY291bnQiLCJtYW5hZ2UtYWNjb3VudC1saW5rcyIsInZpZXctcHJvZmlsZSJdfX0sInNjb3BlIjoib3BlbmlkIHByb2ZpbGUgZW1haWwiLCJzaWQiOiI0ZjVkNTNiZi1jYjBjLTQ3NjktYjIzZi1jMDg1OTFkMzQyY2YiLCJlbWFpbF92ZXJpZmllZCI6dHJ1ZSwibmFtZSI6Ik5lZWwgQmFybWFuIiwicHJlZmVycmVkX3VzZXJuYW1lIjoibmVlbCIsImdpdmVuX25hbWUiOiJOZWVsIiwiZmFtaWx5X25hbWUiOiJCYXJtYW4iLCJlbWFpbCI6Im5lZWxAZW1haWwuY29tIn0.D7V9exfrfRWGH8rzsDJYH51LB1R6MniYdxAYYr31lag"  --request POST --data "{""name"": ""purge job""}" http://127.0.0.1:5000/jobs
HTTP/1.1 401 UNAUTHORIZED
Server: Werkzeug/2.2.3 Python/3.11.2
Date: Sun, 19 Mar 2023 17:43:55 GMT
Content-Type: application/json
Content-Length: 15
Connection: close

"Unauthorized"
However Neel can does have the ViewJob role which allows him to retrieve a job:
curl -i -H "Authorization: Bearer eyJhbGciOiJIUzI1NiIsInR5cCIgOiAiSldUIiwia2lkIiA6ICI4YTBjMzdhNS1mZTc4LTQzZTQtOGYzMC1hZjc5NDg3MTk1YWEifQ.eyJleHAiOjE2NzkyNDg5MzgsImlhdCI6MTY3OTI0NzczOCwianRpIjoiNGRhZTJlNDAtZjE4Yi00OTgxLWEzODctNTdmMGU5OTc2NWY5IiwiaXNzIjoiaHR0cDovL2xvY2FsaG9zdDo4MDgwL3JlYWxtcy9kZW1vIiwiYXVkIjoiYWNjb3VudCIsInN1YiI6ImI3NGQ2Mjg3LTUyNDQtNDU4MC1iYmRkLTg5ODMxMmE4NjJiZCIsInR5cCI6IkJlYXJlciIsImF6cCI6ImpvYnMiLCJzZXNzaW9uX3N0YXRlIjoiNGY1ZDUzYmYtY2IwYy00NzY5LWIyM2YtYzA4NTkxZDM0MmNmIiwiYWNyIjoiMSIsImFsbG93ZWQtb3JpZ2lucyI6WyJodHRwOi8vbG9jYWxob3N0OjUwMDAiXSwicmVhbG1fYWNjZXNzIjp7InJvbGVzIjpbIm9mZmxpbmVfYWNjZXNzIiwiZGVmYXVsdC1yb2xlcy1kZW1vIiwidW1hX2F1dGhvcml6YXRpb24iXX0sInJlc291cmNlX2FjY2VzcyI6eyJqb2JzIjp7InJvbGVzIjpbIlZpZXdKb2IiXX0sImFjY291bnQiOnsicm9sZXMiOlsibWFuYWdlLWFjY291bnQiLCJtYW5hZ2UtYWNjb3VudC1saW5rcyIsInZpZXctcHJvZmlsZSJdfX0sInNjb3BlIjoib3BlbmlkIHByb2ZpbGUgZW1haWwiLCJzaWQiOiI0ZjVkNTNiZi1jYjBjLTQ3NjktYjIzZi1jMDg1OTFkMzQyY2YiLCJlbWFpbF92ZXJpZmllZCI6dHJ1ZSwibmFtZSI6Ik5lZWwgQmFybWFuIiwicHJlZmVycmVkX3VzZXJuYW1lIjoibmVlbCIsImdpdmVuX25hbWUiOiJOZWVsIiwiZmFtaWx5X25hbWUiOiJCYXJtYW4iLCJlbWFpbCI6Im5lZWxAZW1haWwuY29tIn0.D7V9exfrfRWGH8rzsDJYH51LB1R6MniYdxAYYr31lag" http://localhost:5000/jobs/1
HTTP/1.1 200 OK
Server: Werkzeug/2.2.3 Python/3.11.2
Date: Sun, 19 Mar 2023 17:45:27 GMT
Content-Type: application/json
Content-Length: 39
Connection: close

"{\"name\": \"purge job\", \"id\": 1}"
