
Overview
This post discusses how to configure AWS CloudHSM with Nginx. It also discusses why you might want to use CloudHSM and alternatives.
The problem

It's not the 90s - George Michael no longer airs every fifteen minutes on MTV. More importantly, most websites are now secure. With software security becoming more important everyday, even internal services are run on HTTPS and not plain HTTP. Central to using PKI (Public Key Infrastructure) is the private key the organization holds. If this key leaks, everything is lost. In order to understand why this is so, let's take a quick look at how this works.
PKI in one bite
When you want to ensure the communication between your browser and a website is not snooped you need to encrypt the data getting exchanged between your brwoser and website. The way encryption works is by both parties having a known secret which is used to encrypt the data and also decrypt the data.
The main problem with the above method is that you are not the only person communicating with the website. If I am communicating with the website, it means I (or my browser at least) knows the password, which means, if I get hold of your data, I could decrypt it as well.
PKI solves this problem by making this secret dynamic i.e. its computed on the fly and mutually agreed upon by the website and browser. This means your browser is using a different secret than the one I am using.
But then how is the secret agreed upon the very first time? How is it encrypted? If its not encrypted, then we are back to the same problem aren't we? This is where public-private keys come in. A public and private pair of keys are tied to each other mathematically such that data encrypted by the public key can be decrypted by the private key and vice-versa. The web server publishes its SSL certificate which contains the public key. Remember, all of this is related to encryption.
Encryption isn't the only useful function that an SSL certificate provides, it also provides trust. It allows your browser to trust the website you are accessing by giving you a guarantee that the website is really who it claims to be. This is done by the use of digital certificates. A trusted authority signs your certificate which means to say they encrypt information using their own private key. Your operating system comes with a list of public keys belonging to known certificate authorities (CA) like Thawte, VeriSign and others. Your browser then tries to decrypt the information using the known CA's public key, if it succeeds, the website has successfully proved its identity. Note, the process has been hugely simplified, if you want to learn how this works in detail please see the reference links at the end of the article.
Why use CloudHSM
It's clear by now how important it is for an organization to not lose / leak the private key. Services like Azure Key Vault, AWS Key Management Service, Hashicorp Vault provide a secure environment to store, generate, managed such important keys and secrets. The next question is why choose CloudHSM and not something else? Limiting this discussion to only AWS, the question is why choose CloudHSM over AWS Key Management Service (KMS)? The reason I offer is:
- KMS uses HSM but uses hardware tenancy
- Customer strictly wants FIPS 140-2 type 3 compliance
The setup
It is assumed you have a VPC running at least one web server e.g. Tomcat or IIS on an EC2 instance. What we will be doing is:
- Introducing an NGINX box configured as a reverse-proxy
- Create a CloudHSM cluster
- Create a self-signed certificate and offleading TLS decryption to the CloudHSM cluster
The NGINX box
Create a new Amazon Linux 2 EC2 instance. Download the key pair for SSH access and the regular stuff. Install nginx using:
> sudo amazon-linux-extras install nginx1
In this example we are relaying all traffic coming to NGINX's 8080 port to an internal EC2 instance having the same port. Go ahead and change the ports to suit your requirement. Change the content of the file to:
server {
    listen       8080;
    listen       [::]:8080;
    server_name  svlx.com;
    location / {
            proxy_pass "http://:8080" ;
    }
}
Important NGINX commands:
- Start nginx: sudo /usr/sbin/nginx
- Stop nginx: sudo kill -QUIT $( cat /run/nginx.pid )
Start NGINX, browse to the public IP address of the NGINX server and you should be served the correct content originating from your actual application/web server.
Creating the HSM Cluster
Before creating the HSM cluster, we need to have a private key. In production cases, this is the organization's private key which is probaby kept in a very secure system. For us, we'll just use OpenSSL to generate a new key.
The following command is executed on the NGINX server. It generates a private key (.key file) and a certificate containing the public key (.crt file). OpenSSL will ask a lot of questions, the only important answer is the value of Common name, e.g. svlx.com.
> sudo openssl req -x509 -nodes -days 365 -newkey rsa:2048 -keyout /etc/ssl/private/nginx-selfsigned.key -out /etc/ssl/certs/nginx-selfsigned.crt
> sudo openssl dhparam -out /etc/ssl/certs/dhparam.pem 2048
We can actually start using this certificate in NGINX immediately without using CloudHSM at all. The only change to make is in the /etc/nginx/conf.d/ssl.conf file:
server {
    listen 8443 ssl;
    server_name svlx.com;
    location / {
            proxy_pass "http://ip-10-0-1-96.ec2.internal:8080" ;
    }
    ssl_certificate /etc/ssl/certs/nginx-selfsigned.crt;
    ssl_certificate_key /etc/ssl/private/nginx-selfsigned.key;
    ssl_dhparam /etc/ssl/certs/dhparam.pem;
    ssl_protocols  TLSv1 TLSv1.1 TLSv1.2;
}
Note, the above change is only for informational purpose and is not needed for configuring AWS CloudHSM.
Creating the HSM cluster
- Start the AWS Management Console and head over to CloudHSM
- Select the correct VPC which contains the NGINX server
- Select one subnet from each AZ

Once the cluster is created, it is in an unitialized state. A new SG is created with the name cloudhsm-cluster-<cluster-name>. This security group contains a preconfigured TCP rule that allows inbound and outbound communication over ports 2223-2225, this is required to 'talk' to the HSM.
The HSM itself is not part of our VPC, it is created in a VPC managed by AWS. Creating the cluster takes around 5 minutes.
Attach the HSM cluster security group
Attach the HSM cluster security group to the NGINX EC2 instance. Remember, the name of the cluster is like this cloudhsm-cluster-<cluster-name>, this security group is auto-created by the HSM cluster creation process.
Initialize the Cluster
Intialize the cluster, this process creates the first HSM node.
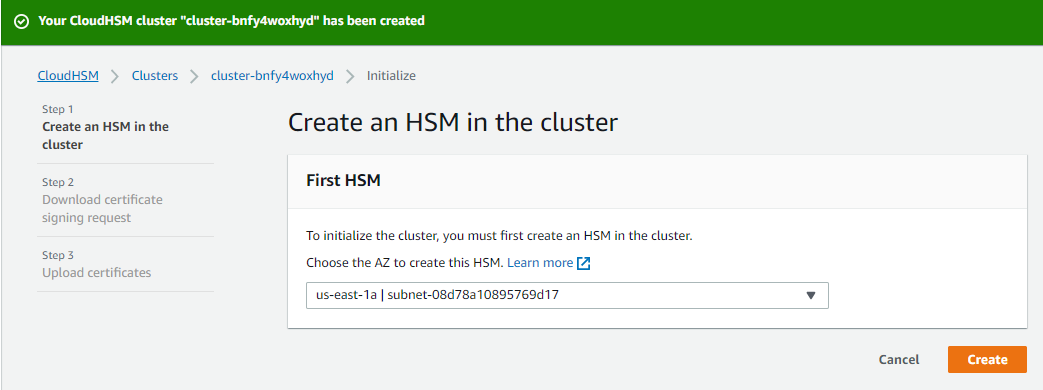
This process takes around 5 - 10 minutes. Once initialized, the first thing to do is to download the certificate signing request file. Copy this file to your desktop and then copy it to your NGINX machine. The following commands sign the request using the private key created earlier and store the generated certificate to the correct location.
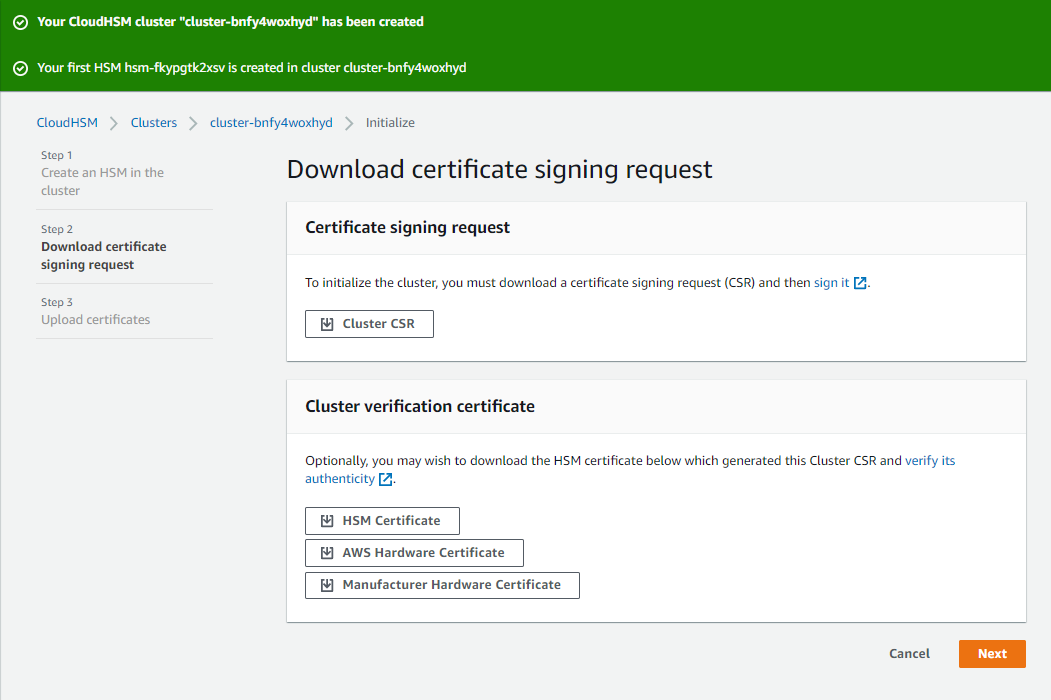
> sudo openssl x509 -req -days 3652 -in cluster-bnfy4woxhyd_ClusterCsr.csr -CA /etc/ssl/certs/nginx-selfsigned.crt -CAkey /etc/ssl/private/nginx-selfsigned.key -CAcreateserial -out bnfy4woxhyd_CustomerHsmCertificate.crt
> sudo cp bnfy4woxhyd_CustomerHsmCertificate.crt /opt/cloudhsm/etc/
Click Next in the AWS console and select the two certificates in the next screen.
Cluster certificate - the signed certificate which is bnfy4woxhyd_CustomerHsmCertificate.crt
Issuing certificate - nginx-selfsigned.crt
Click Next.
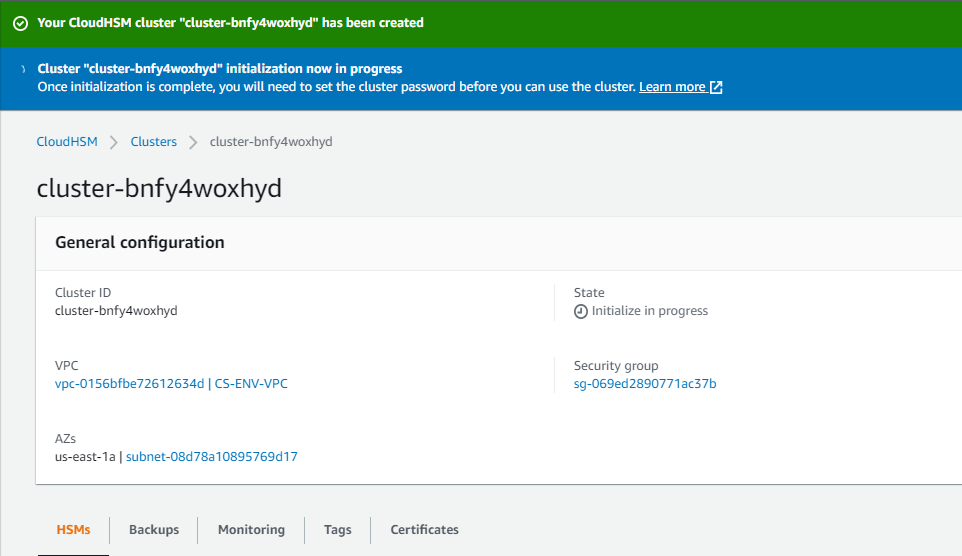
The cluster takes arounf 5-10 minutes to initialize. Once initalized, you'll see the message: "After a while you will see the message "Cluster "cluster-bnfy4woxhyd" initialization complete"."
Installing HSM software on the EC2 instance
Amazon provides HSM client software for Linux and Windows. Since we are using NGINX on an Amazon Linux2 EC2 instance, all code presented here will use that.
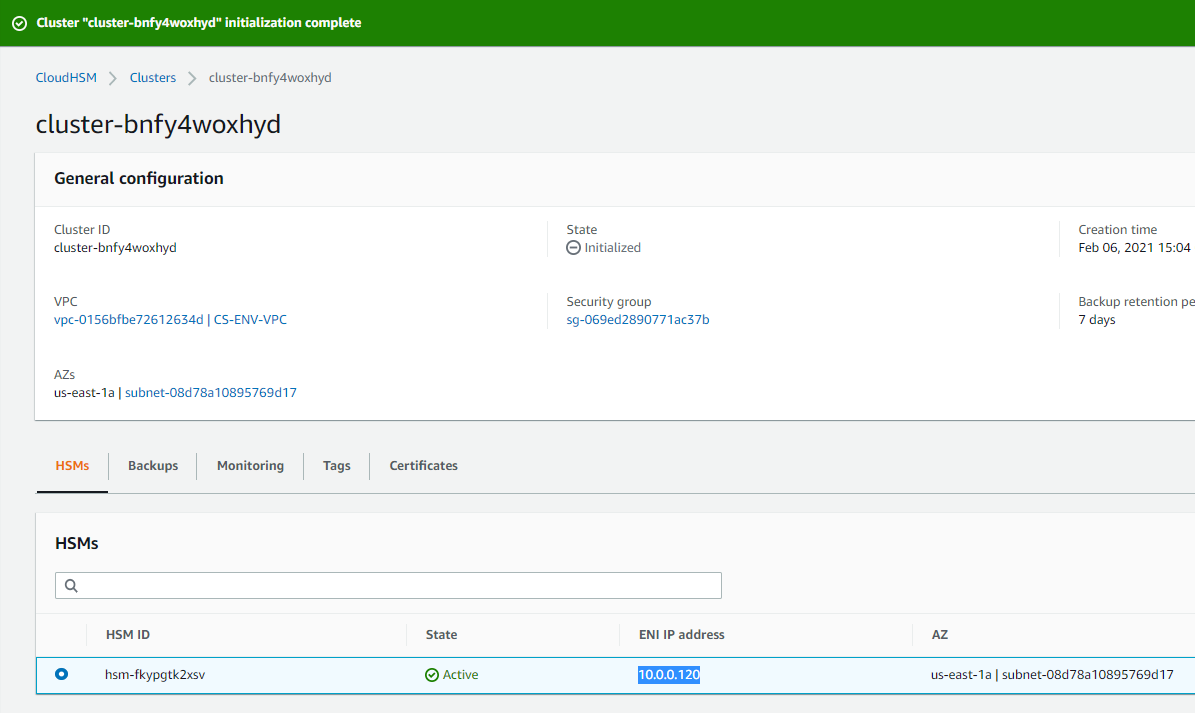
Note down the IP address of the elastic network adapter. We will need this while configuring the Cloud HSM client in the next step.
# check the name of the Linux distro/release
cat /etc/os-release

# download the HSM client
wget https://s3.amazonaws.com/cloudhsmv2-software/CloudHsmClient/EL7/cloudhsm-client-latest.el7.x86_64.rpm

# install the HSM client
sudo yum install -y ./cloudhsm-client-latest.el7.x86_64.rpm

# copy the organizations public key (certificate)
sudo cp /etc/ssl/certs/nginx-selfsigned.crt /opt/cloudhsm/etc/customerCA.crt

# Update the HSM client with the HSM IP (see the screenshot above)
sudo /opt/cloudhsm/bin/configure -a 10.0.0.120

# Start the HSM Client
sudo service cloudhsm-client start
sudo /opt/cloudhsm/bin/configure -m
sudo /opt/cloudhsm/bin/configure --ssl --pkey /opt/cloudhsm/etc/ssl-client.key --cert opt/cloudhsm/etc/ssl-client.crt
Setting up the HSM users
After initialization, the HSM contains a pre-crypto officer (PRECO) having userid 'admin' and password 'password'. We need to login as the PRECO and change the password to become a CO (crypto officer). Follow the steps below to do this:
> /opt/cloudhsm/bin/cloudhsm_mgmt_util /opt/cloudhsm/etc/cloudhsm_mgmt_util.cfg
aws-cloudhsm>loginHSM PRECO admin password
aws-cloudhsm>changePswd PRECO admin better2bnice
aws-cloudhsm>logoutHSM
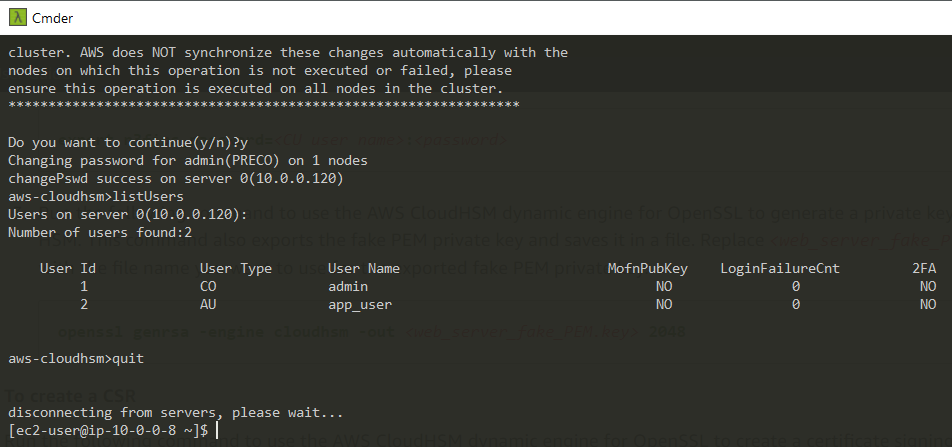
Login to the CloudHSM as CO with the new password and create a new crypto-officer user. The CO user is used by the HSM Dynamic OpenSSL Module for CludHSM by NGINX.
> /opt/cloudhsm/bin/cloudhsm_mgmt_util /opt/cloudhsm/etc/cloudhsm_mgmt_util.cfg
aws-cloudhsm>loginHSM CO admin better2bnice
aws-cloudhsm>createUser CU svlxuser pa$$word
aws-cloudhsm>logoutHSM
Now, login as the CO user svlxuser and change your password in the same manner.
Configuring NGINX to use CloudHSM
NGINX can make use of CloudHSM for offloading TLS decryption to the CloudHSM nodes. This is done via OpenSSL bridge and requires us to install the OpenSSL Dynamic Engine for CloudHSM. Follow the steps below to install it:
# download the library
wget https://s3.amazonaws.com/cloudhsmv2-software/CloudHsmClient/EL7/cloudhsm-client-dyn-latest.el7.x86_64.rpm

# install the module
sudo yum install -y ./cloudhsm-client-dyn-latest.el7.x86_64.rpm

# check the library is present after installation
ls /opt/cloudhsm/lib/libcloudhsm_openssl.so
The next step is to create a private key and certificate for using on NGINX. Note, we could import existing keys into the HSM also. In this example, we'll create new keys:
# this evn var has to be set with the CU user and his password
n3fips_password=svlxuser:better2bnice
export n3fips_password=svlxuser:better2bnice

# this fake key allows the use of CloudHSM
openssl genrsa -engine cloudhsm -out web_server_fake_PEM.key 2048
openssl req -engine cloudhsm -new -key web_server_fake_PEM.key -out web_server.csr

# you can leave everything black except the common-name, make sure this is correct e.g. svlx.com.
openssl x509 -engine cloudhsm -req -days 365 -in web_server.csr -signkey web_server_fake_PEM.key -out web_server.crt
The last step is to configure NGINX to use the generated certificates and tell it to use CloudHSM .
# Configure Nginx to use the new key & certificate
sudo cp web_server.crt /etc/ssl/certs/web_server.crt
sudo cp web_server_fake_PEM.key /etc/ssl/private/web_server_fake_PEM.key

# Make sure NGINX can access the files
sudo chown nginx /etc/ssl/certs/web_server.crt /etc/ssl/private/web_server_fake_PEM.key

# Backup any existing configs as we are going to be changing these
sudo cp /etc/nginx/conf.d/ssl.conf /etc/nginx/conf.d/ssl.conf.backup
sudo cp /etc/nginx/nginx.conf /etc/nginx/nginx.conf.backup

# Add the following lines at the top of the file.
# # Added for AWS Cloud HSM
#   ssl_engine cloudhsm;
#   env n3fips_password;
sudo nano /etc/nginx/nginx.conf

# Contents of the ssl.conf file:
# server {
#    listen 8443 ssl;
#    server_name svlx.com;
#    location / {
#            proxy_pass "http://ip-10-0-1-96.ec2.internal:8080" ;
#    }
#    ssl_certificate /etc/ssl/certs/web_server.crt;
#    ssl_certificate_key /etc/ssl/private/web_server_fake_PEM.key;
#    ssl_dhparam /etc/ssl/certs/dhparam.pem;
#    ssl_protocols  TLSv1 TLSv1.1 TLSv1.2;
# }
sudo nano /etc/nginx/conf.d/ssl.conf

# Add the following line under [Service]
# Environment=n3fips_password=svlxuser:better2bnice
sudo nano /lib/systemd/system/nginx.service

# Stop NGINX if running
sudo kill -QUIT $( cat /run/nginx.pid )

# Reload and run NGINX as a service
sudo systemctl daemon-reload
sudo systemctl start nginx
systemctl status nginx.service

# Use to view all properties of a service. Needed only if things are not working.
systemctl show nginx
You should now to be able to browse the same URL but now NGIX will be using CloudHSM.
