 Download related material
Containers seem to be the hot topic now-a-days. Though late in the game, Microsoft finally has added support for containers. Support for containers and Docker have been there in the various CTPs of Windows 2016 & even Windows 10 insider builds & the anniversary update. This post however will use Windows 2016 RTM only. There is more than enough information on containers in general so I won't spend too much time on that but concentrate on using Docker on Windows to work with containers.
Just to recap - Containers are isolated, resource-constrained and portable operating environment for applications. The magic of isolating and constraining resources is not something Docker does on its own, it depends on the operating system to provide these capabilities.
On Windows, you can create two types of containers:
- Windows 2016 server containers (works on Windows 2016 only)
- Windows Hyper V containers (works on Windows 2016 as well as Windows 10)
This post will be talking only about Windows 2016 containers, I call these 'true' containers as there is no virtual machine (hypervisor layer) involved.
To get started with using containers, you can download a trial edition of Windows 2016 Server from here. The best option is to install Windows 2016 server (with desktop experience) as a virtual machine using VMWare or Virtual Box or Hyper-V. If you are planning to install it directly on your hard-disk, make sure you have drivers especially network/wireless-adapter drivers which will work on Windows 2016. My own experience wasn't very positive, Windows 10 drivers for my wireless-adapter did not work on Windows 2016 so I ended up wiping the parition clean off Windows 2016.
Here is what you need to get started with containers on Windows 2016 server:
- Install Windows 2016 with desktop experience
-
Install Docker using the following PowerShell commands.
Install-PackageProvider -Name NuGet -MinimumVersion 2.8.5.201 -Force
Install-Module -Name DockerMsftProvider -Force
Install-Package -Name docker -ProviderName DockerMsftProvider -Force
Restart-Computer –Force
Note: this did not work for me, Docker package kept failing, here is a workaround for that:
Download the Docker binaries directly from this link.
Unzip both dockerd.exe and docker.exe to a folder.
Add the folder to the system path.
Register Docker daemon to run as a service by entering 'dockerd --register-service' at the command prompt (with Administrator privileges).
Getting the base OS image
Now that we've got Docker daemon running, we need to download the base operating system image. Prior to this when I had used CTP5, I used the PowerShell command
Install-ContainerImage -Name WindowsServerCoreIn this post, I'll use Docker's own command to get the image:
docker pull microsoft/windowsservercoreNote, both commands end up downloading 5 GB or more worth of bytes.
Running the image
If all went well and the base OS image is downloaded, you should be able to see the image using the following Docker command docker images.
 'microsoft/windowsservercore' is the base OS image. As you create additional images, those will be listed too. Now let's run the image:
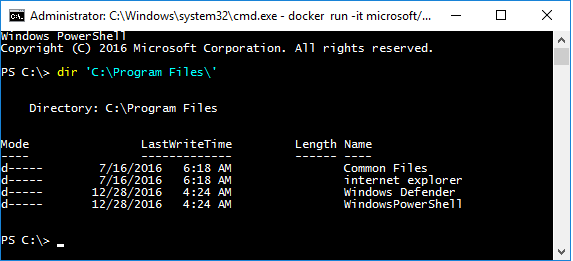
c:\>docker run -it microsoft/windowsservercore cmd.exeThe above command will run a containerized version of cmd.exe. Instead of cmd.exe you could have started PowerShell.exe. The '-it' switch runs the containers in an interactive mode for e.g. while in the command prompt, you can run PowerShell or start other processes, all these will be run within the container. Try and run the DIR command on C:\Program Files, you'll see a very small set of install applications unlike what you have on your container's host.
You can use the 'docker ps' command to list all running containers:

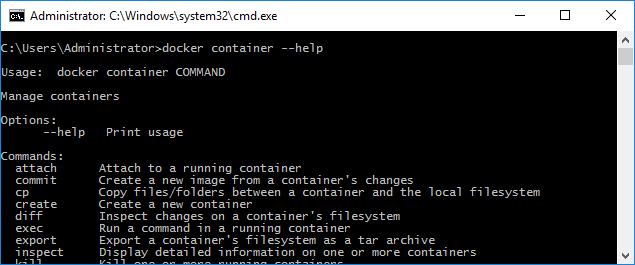
In the image above you can see that I have two containers running. Each time a container runs, it gets a unique ID (container id) and also a name, in the image you can see the two names 'sick_bell' & 'focused_babbage'. To work with any of the containers, use the 'docker container' command e.g. 'docker container --help'.
It's usually a good idea that whatever process that is running within a container shuts down on its own. What I mean is, if you're running a service, it would be a good idea to have a way to send a 'stop' command to shut the process down instead of using docker's container commands like stop. To end the container you started, enter EXIT at the command prompt.
Running you own service in a container
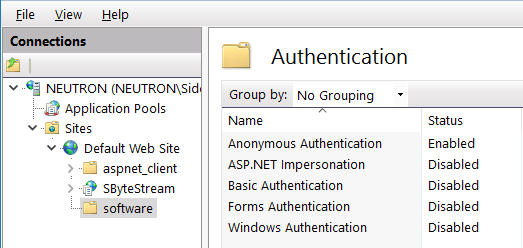
Now that we know how to run a container from an image, let's try to containerize our own application. For this post, I'll use a sample service application called TWS (time webserver) which is a .NET exe that listens on a particular port. It responds to request for retrieving the server time, printing the current logfile and request to stop. The source code plus exe can be downloaded from here. To use this application, we need a way to copy this exe to the container which can be done in many ways. For this post, I have copied this exe to my physical machine's IIS within a directory called 'software'. This means that I am using the host machine within which Windows 2016 is running as a virtual machine. Why am I not using the virtual machine's IIS? This is because of a current bug whereby the container's host's IP address is not accessible from a container on Windows - weird. Moving on, ensure anonymous authentication is enabled for the 'software' folder so we can easily access the file from HTTP from the container.
With that set, lets now prepare to run our tws server in a container. Open an new command prompt in Windows 2016 Server:
C:\Users\Administrator>docker run -it microsoft/windowsservercore cmd.exePressing enter will start the container and you'll now be in the container's command prompt. Keep the host machine's (not the Windows 2016 virtual machine but the physical machine's) IP address handy and enter the following command in the container's cmd prompt:
C:\>mkdir c:\tws
C:\>cd c:\tws
c:\tws>PowerShell -Command (New-Object System.Net.WebClient).DownloadFile('http://192.168.1.106/software/tws.exe', 'c:\tws\tws.exe')
c:\tws>tws -port 8001 -logfolder c:\tws
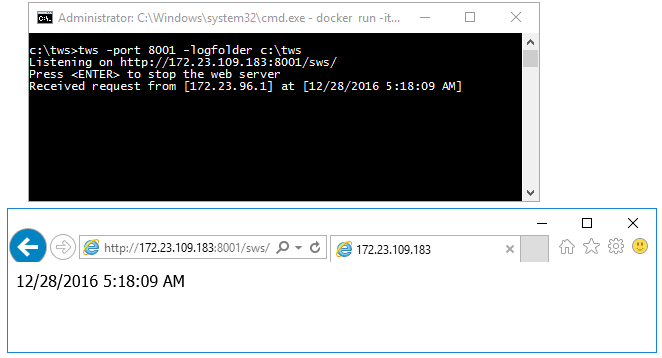
If all goes well, you should have the tws application running like shown below:

Tws.exe prints the URL from where it can be access when it starts as shown in the screenshot above. While in Windows 2016, start a web browser and navigate to the URL printed by TWS, you should see a response like this:
Each time a request is received, TWS write a log entry to a file. These entries can be requested by appending '/viewlog' to the same URL e.g.:
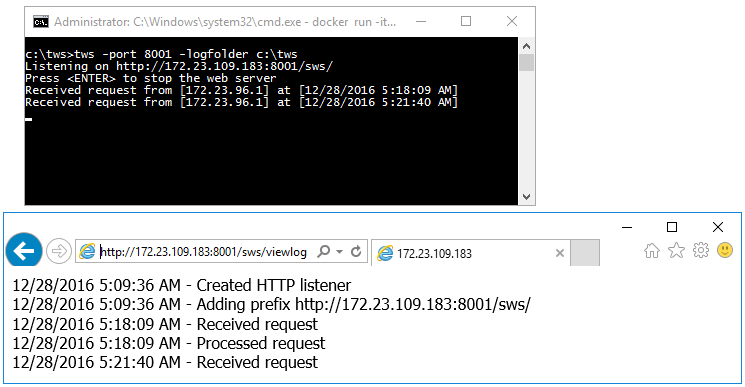
An interesting thing to note is that IP address in the URL printed by TWS; this IP address is a dynamic IP addressed assigned to the container which is accessible only from the container's host operating system which is our Windows 2016 server. If you want to make this application accessible to other machines you need to use the -p option of Docker. Get back to the container and press ENTER to shut down TWS. Enter exit to shut down the container.
We'll now use the '-p' switch to make our service available to devices other than the container host. Just like before start the container using docker's run command but this time tell Docker to map port 8001 of the server (the first part of 8001:8001) to the container 8001 port; needless to say both the port can be different if you want. .
C:\Users\Administrator>docker run -it -p:8001:8001 microsoft/windowsservercore cmd.exe
Now in the container's cmd prompt, enter the following:
C:\>mkdir c:\tws
C:\>cd c:\tws
c:\tws>PowerShell -Command (New-Object System.Net.WebClient).DownloadFile('http://192.168.1.106/software/tws.exe', 'c:\tws\tws.exe')
c:\tws>tws -port 8001 -logfolder c:\tws
You shoud now be able to access the TWS server from outside the container's host (the Windows 2016 machines/virtual machine) by replacing the container's IP address with the container host's IP address.
Building our own image
Now that we know our service is working fine within a container, let's create an image out of it so that all the changes we've made are persisted and next time on we won't have to download the service first.
I have decided to name my image sids/tws2, you can choose your own name. Shut down the container by going back to the container's command prompt and pressing ENTER to stop the service and then run the exit command to exit the command prompt which automatically shutsdown the container. Let's now see the list of container we have been running:
docker ps -a
The above command will show you all containers that are or have been running as shown in the screenshot below:
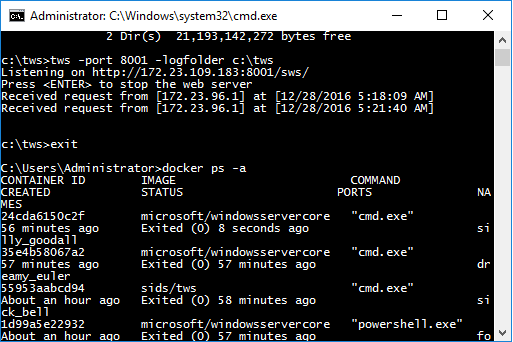
We want to create an image from the last container which we ran. Note down the container ID of the first row and use the Docker commit command:
docker commit 24cda6150c2f sids/tws2
Note: replace 24cda6150c2f with the ID on your system. Now run the docker images command to check if your image is in the list, it should be. You now have a service ready to run in your new image.
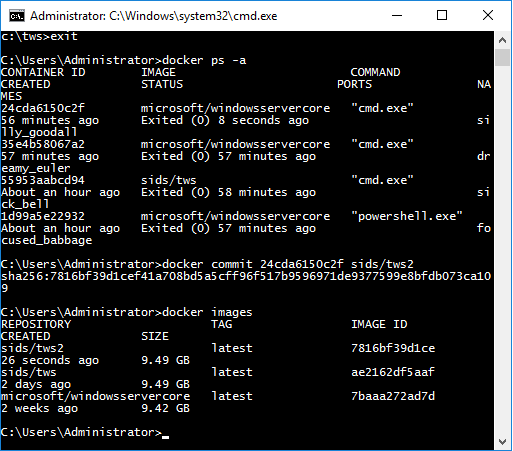
This is one way to create an image. The other way is to script the image creation which I'll cover in the next post along with how to persist data in the same post.
 Download related material
